
Last Updated on January 12, 2020 by Chef Mireille
 When you first start baking pies, you will start hearing expressions like blind bake. It took me a while to figure out what that was, but once I did figure it out, it makes all the difference when baking pies. Even though many pie recipes, both savory and sweet, won’t require a baked pie crust, I always bake mine. When I don’t, I always end up with soft and gummy crusts especially on the bottom layer when you have very wet fillings. This way, my crust is always flaky and crispy.
If I am worried about the crust getting too browned when the pie itself is cooking, I will cover the crust with some aluminum foil when the pie is actually baking. However, I prefer an overbaked crust any day to an under baked one or one that is gummy.
Blind Baked Pie Crust
Prep Time: 75 minutes (includes 60 minutes resting time)
Cook Time: 30 minutes
Yield: 3 pie crusts
Ingredients:
- 4 cups all purpose flour
- 1/4 teaspoon salt
- 2 tablespoons sugar
- 8 oz. cold unsalted butter, cut into cubes
- 4 tablespoons cold vegetable shortening
- 6-10 ounces cold water
Sift flour, salt and sugar in a large bowl.
Using a pastry blender, cut in the butter and shortening until it resembles the size of small peas.
Add water a little at a time and mix by hand, just until the dough comes together.

Divide equally into three portions. Wrap separately in plastic wrap.
Or you can wrap 2 10 oz. portions for regular pies and 1 13 oz. portion for a deep dish pie.
Refrigerate the one or two (if doing a top crust) you are going to use immediately for 1 hour. Freeze the other two for later use.
Preheat oven to 375 F.
On a lightly floured surface, roll out into a circle as thin as possible. Fold the dough over. Carefully transfer to a pie plate.
You can choose to do a straight edge or a crimped edge. I am not the most artistic person in the world (that’s why I’m not a cake decorator – I’ll bake it but get someone else to frost and decorate it), so I don’t usually crimp my crusts, but for the purposes of this post, I decided to make an attempt. Your crimped crust will probably have far better results.
To make a crimped crust, cut off the excess dough around the perimeter of the pie plate and crimp so that the edge of the crust is right at the rim of the pie plate. Remember make it as high as possible because the crust will shrink during the cooking process.
To make a straight crust, cut off excess, however you can let some hang over the side of the pie plate. After the pie is baked, you can then snap off the excess crust using the back of a spoon. (please excuse the mediocre photos and keep in mind this pie had a rough journey as it had to travel from my home to my sister’s for Thanksgiving and then I had to take the photos at her place without my photo setup, not to mention my camera battery died so I also had to borrow hers and take with a camera I am unfamiliar with…can anything else have gone wrong for these photos?)

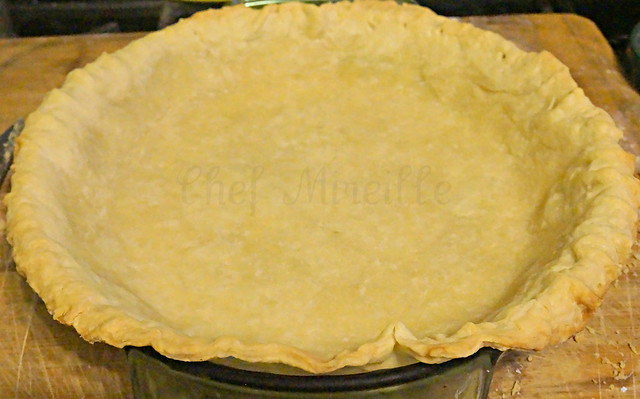
Cover with a piece of waxed paper or parchment. Place dried beans or pie weights inside and bake for 30 minutes. This is so you don’t get air pockets while baking.

Now you have your blind baked pie crust.
Fill with desired filling and bake as directed.
Notes:
If using for a savory dish as in quiche, eliminate the sugar and increase the salt to 1 teaspoon.
You must refrigerate the dough. If you don’t, the dough will be too sticky to handle.
Stay tuned next week for the actual pie recipes used in the photos in this post.

Homemade Blind Baked Pie Crust
Ingredients
Instructions
- Sift flour, salt and sugar in a large bowl.
- Using a pastry blender, cut in the butter and shortening until it resembles the size of small peas.
- Add water a little at a time and mix by hand, just until the dough comes together.
- Divide equally into three portions. Wrap separately in plastic wrap.
- Refrigerate the one you are going to use immediately for 1 hour. Freeze the other two for later use.
- Preheat oven to 375 F.
- On a lightly floured surface, roll out into a circle as thin as possible. Fold the dough over. Carefully transfer to a pie plate.
- You can choose to do a straight edge or a crimped edge. I am not the most artistic person in the world, so I don't usually crimp my crusts, but for the purposes of this post, I decided to make an attempt. Your crimped crust will probably have far better results.
- To make a crimped crust, cut off the excess dough around the perimeter of the pie plate and crimp so that the edge of the crust is right at the rim of the pie plate. Remember make it as high as possible because the crust will shrink during the cooking process.
- To make a straight crust, cut off excess, however you can let some hang over the side of the pie plate. After the pie is baked, you can then snap off the excess crust using the back of a spoon.
- Cover with a piece of waxed paper or parchment. Place dried beans or pie weights inside and bake for 30 minutes. This is so you don't get air pockets while baking.
- Now you have your blind baked pie crust.
- Fill with desired filling and bake as directed.
Do you know anyone else who likes learning about international food, culture, history and travel? Bring them over here to join the party! Don’t forget to use those share buttons!
Start Here to find out how the Schizo Chef can help you with your cooking, travel and other needs!
If you like this recipe, PLEASE LEAVE A COMMENT & SUBSCRIBE!

Didn’t know about blind baking…sounds like a must try
Sounds like an easy baked pie crust, bookmarking, gonna try soon.
my mini tarts are on the way next week, I too learnt about blind baking recently 🙂 informative post ! dont worry about the pic quality, they are perfect 😀
Pie crusts have always eluded me, your recipe sounds easy enough to try. There seems to be a typo for quantity of sugar in the recipe on the top.
thanks Pavani. I fixed it
This is a very useful post. “Blind baked” term is new to me. I have baked pie only thrice. I too like the crust to be crispy and flaky.
This is a keeper recipe. Thanks for sharing. My crust always broke fro here and there.Now I know the perfect recipe.
I do not make pied that much and when ever I do, I just buy ready made pie crust.
That’s a new term for me, though as you said I have always worried on that less baked pie crust..good one…will try it next time, though its been ages since I baked a pie..